Setting up a CS:GO server in the AWS cloud
During the COVID-19 global pandemic, my company decided to force every employee to work from home until further notice. In the beginning, it was a dream come true: no more commuting to work, saving time, money and frustration. However, as days passed by, separation started to have an impact on team morale. To mitigate this, we started having morning coffee talks over Skype and such, but those always faded into doing something work-related – we needed something pure fun. Like playing CS:GO in the evenings!
The need for a server
This idea worked, we have at least one session per week nowadays, even during the 7th month of the work-from-home era. The needs were growing rapidly as more and more current and ex team members joined the nightly games, reaching some limitations.
- Ideally, we want to play in one team, but without a dedicated server, a team can have up to 5 players only.
- There is no possibility to disable auto-balance. It’s fun having no bots in our team and having lots of them in the other!
- Sometimes it’s fun to have a full-house game, with a custom server we can play 10 vs. 10 games with lots of bots running around.
- We can control all sorts of things in the server like bot difficulty, map groups, change map on demand and so on.
First, we purchased a server on a host provider, which made all of these possible – at a cost. Is there a way to create one for free? Well, maybe.

Why AWS?
At this time, I was studying for my AWS Developer Associate certification, so my first idea was to use the AWS cloud as long as the free tier is enough. For our use case this includes (per month):
- 750 hours of EC2 t2.micro instance usage – this is basically one instance running all time
- 30 GB of general purpose Elastic Block Storage
- 15 GB of outbound bandwidth
First thought: dockerize all the things!
I’m just fascinated by Docker, so my first thought was to find an appropriate base image and use that. This way, I can do experiments on my local machine, then simply launch it on an EC2 instance when I’m done (unfortunately, by the time writing this, there is no other free Docker-base options available).
I found Gonzih’s docker image, however I ran into several issues. The biggest pain point was that it contains an outdated version, so an update is needed each time I build the image, increasing it’s side enormously (above 40GB), which would fall out of AWS free tier. Maybe it could be reduced by using multi-stage builds, but at this point, I had to admit that this problem is easier to solve without Docker.
However, if size doesn’t matter to you, or just want to play around with it locally, I would definitely suggest trying out the dockerized version.
Installing the server
So, let’s get to it and install our server on a virtual machine directly.
Launching the instance
- First, we need to create an AWS account. I think it’s pretty straightforward – only thing is, that you must provide a credit card number, although you won’t be charged until you reach the end of the free tier; I will show you at the end of this article how to set an alert for that.
- Then sign in (as a root user) and select the AWS region closest to you. Having located in Hungary, I chose eu-central-1 (Frankfurt). This step is important, as you can reduce latency to your server, which is crucial for online gaming.
- Navigate to services and select EC2, then launch an instance.
- I chose Ubuntu Server 20.04 LTS, because that’s what I’m most familiar with, and we won’t use anything that would be preinstalled on Amazon Linux – they would just take up precious space unnecessarily.
- Leave instance type on t2.micro since that’s the only option eligible for free tier, and it will be enough for our use case.
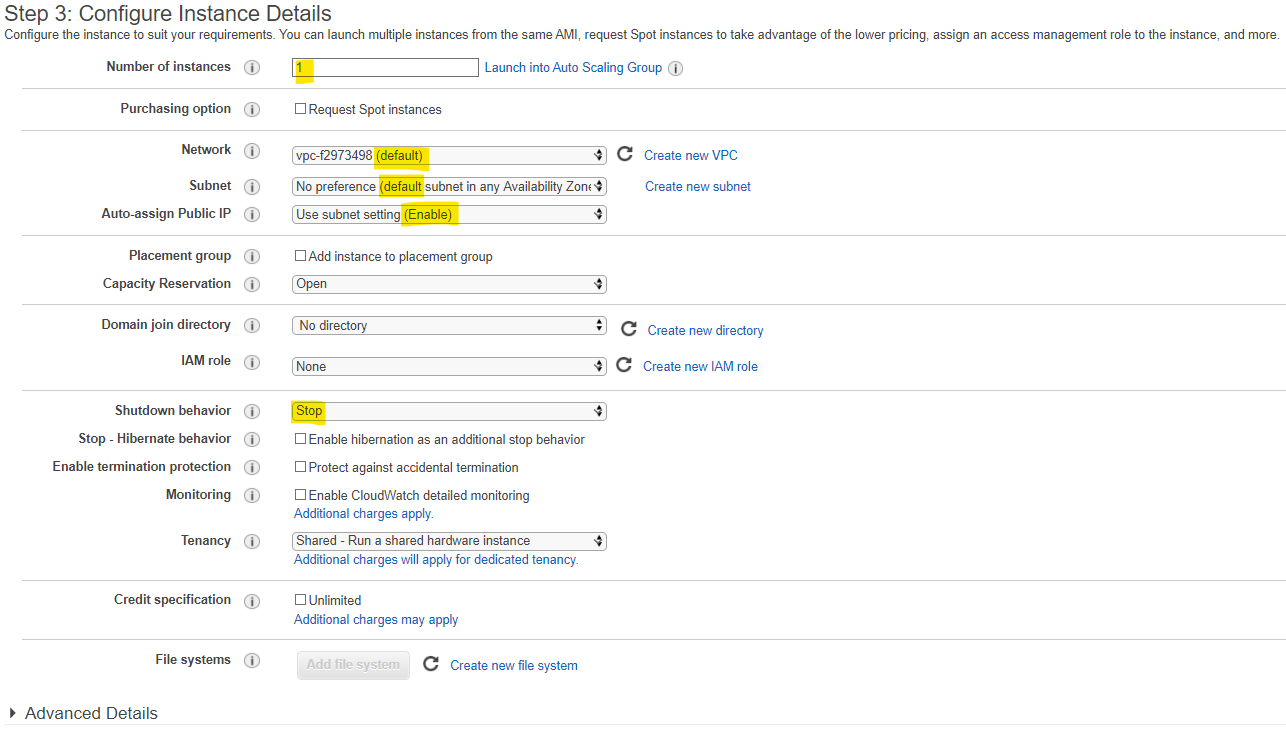
- Instance details:
- Feel free to use the default VPC and set no preference for subnet
- Auto-assign a public IP, however we will replace this with Elastic IP later
- Make sure Shutdown behavior is set to Stop, because otherwise, shutting down your service will erase all data on it
- Everything else can be left on default settings
- Add 30 GB storage. This is the largest you can set for the free tier, and you will need it as the server takes up more than 20 GB.
- Add the “Name” tag so you will be able to identify this instance more easily.

- Create a Security Group allowing all outbound traffic and inbound traffic for SSH and the server from all sources (0.0.0.0/0)
- TCP port 22
- UPD and TCP port 27015

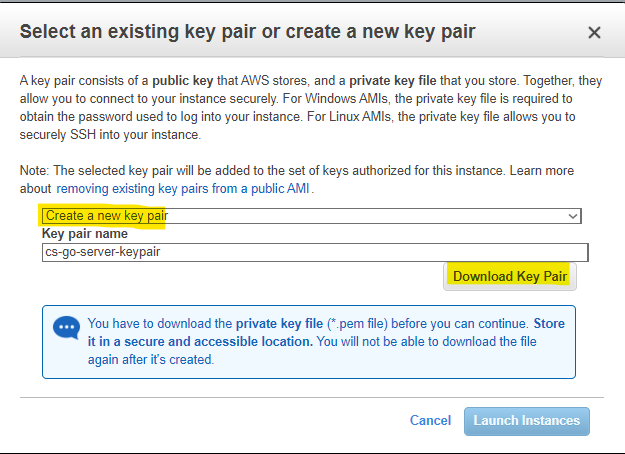
- Create and download a new key-pair. Keep this safe, because this is the only way to SSH into your running instance.
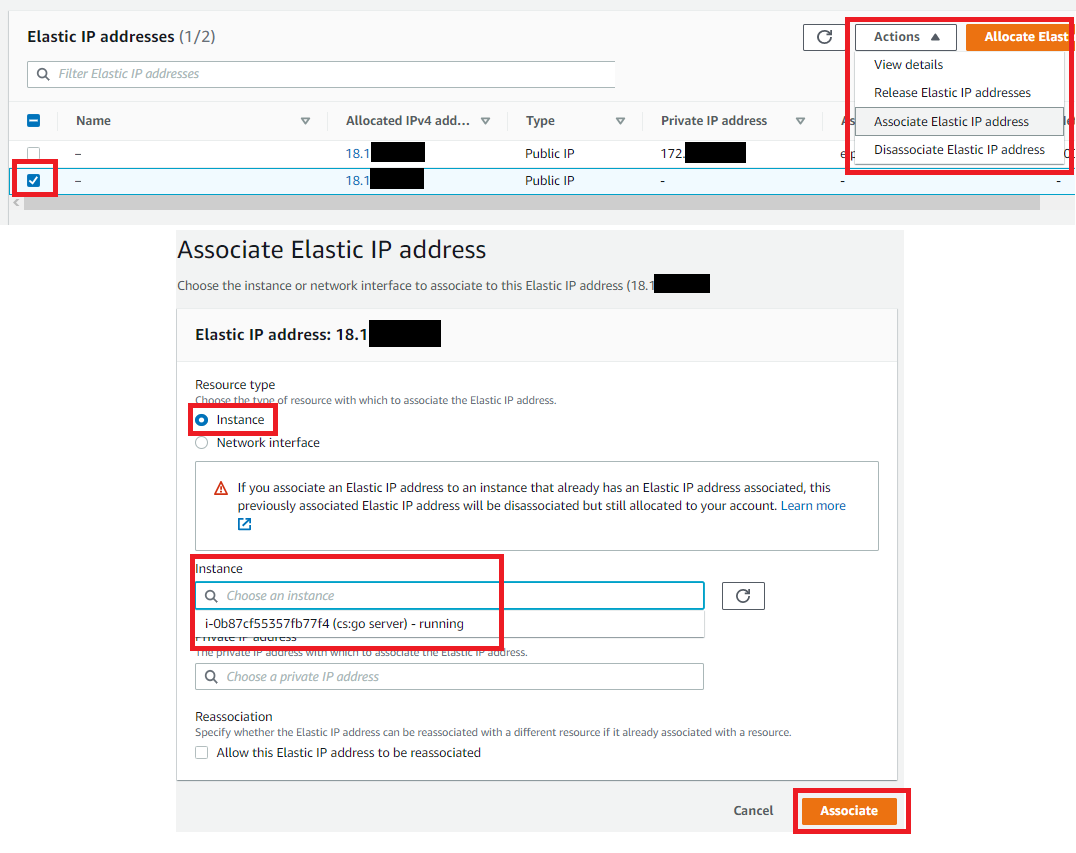
- I suggest creating an Elastic IP and assigning to your instance. As long as it is attached to a running instance, it’s free, and you can re-assign it to another instance later if you have to, without having server users update their local configuration with a new IP. Make sure not to stop your running instance after assigning an Elastic IP address to it, because Amazon will charge you for it. If you wish your instance to be stoppable, do not assign an Elastic IP address, and distribute the public IP after each instance startup.
- On the EC2 dashboard, select Elastic IP
- Select Allocate Elastic IP address
- Select it and assign it to your running instance
Configuring the server
- Open up an SSH client and connect to your launched instance. You can use PuTTY or git bash on Windows, or the built-in ssh client on other operating systems. You will need the public IP address of your instance, which is either your Elastic IP or the automatically assigned one. Check it on the EC2 dashboard!

ssh -i cs-go-server-keypair.pem ubuntu@client_ip - In case you encountered with “UNPROTECTED PRIVATE KEY FILE!” error, run the following command and try again.
sudo chmod 600 cs-go-server-keypair.pem - Create a folder for your server files. The location doesn’t matter, however, I don’t use the current user’s home directory, as later I’d like to control the server with a user with less privileges.
sudo mkdir /var/csgosv - Install updates and add repository for the next steps.
sudo -- sh -c 'dpkg --add-architecture i386; add-apt-repository multiverse; apt-get update; apt-get -y dist-upgrade' - Install the Steam CLI
sudo apt-get install -y steamcmd - Start Steam CLI and run installation steps. You can use anonymous login at this step. App ID 740 refers to CS:GO. Feel free to make yourself a coffee at this point, as this will take several minutes.
steamcmd force_install_dir /var/csgosv login anonymous app_update 740 validate - Create a Game Server Login Token in Steam. You’ll need this to start your server so that others can connect to it. Follow this link. As you can see, there are several preconditions to do this, so if you have a limited account, this step won’t be free. Best workaround is to transfer some money to your steam wallet, which can be used later.
So, at this point you have everything to start your server. In the next sections I will describe some further actions I made to my server.
Start script
I created a script that spins up the CS:GO server. I start it as a screen session, so the server can keep running in the background and it is possible to reattach to it from another SSH session.
- SSH into the running instance.
ssh -i cs-go-server-keypair.pem ubuntu@client_ip - Install screen.
sudo apt-get install screen - Create this
start.shscript in your CS:GO server root directory (which is/var/csgosvif you followed me word-by-word).#!/bin/sh screen -dmS csgo bash -c './srcds_run -game csgo -console -usercon +map office +hostname YOUR_HOST_NAME +sv_setsteamaccount YOUR_GAME_SERVER_LOGIN_TOKEN +sv_password PASSWORD_FOR_SERVER' screen -xFirst line starts a screen session named csgo and launches a command that spins up the server starting on map Office, with the given host name and password. The password is not a necessity, but I keep my server up all the time and wouldn’t like others to join it accidentally. The Game Server Login token is provided here as well. Last line attaches the console to this screen session.
Running this script will start the server in a way that you will be able to reattach to it anytime. If you close your SSH client, open another session, the screen -r csgo will take you back where you left off – you have full control over your server again.
Create a user for server handling
To start and control the server, you need to login to it via SSH. I created a separate user for this and allowed password login to the server, so other guys in the team can do that, further raising the Bus factor of our project.
- SSH into the running instance.
ssh -i cs-go-server-keypair.pem ubuntu@client_ip - Add a user.
sudo adduser user_name - Enter a password for the user.
- Finally, to enable password authentication, change the
PasswordAuthentication notoyesin the/etc/ssh/sshd_configfile. So, if you don’t provide the key file, you will be prompted to provide a password.
This new user won’t be on the sudoers list, so after signing in with it, your instance will be more protected.
Attach to server on SSH login
I created the user only for controlling the server. I’d like it to automatically start the server or attach to it when already running on login. It is very convenient and to be honest, pretty cool as well. I created this script and copied to the /etc/profile.d directory.
#!/bin/sh
if [ "$(whoami)" = "SERVER_CONTROLLER_USER" ]; then
  if [ -z "$(ps -la | grep srcds_linux )" ]; then
    echo "Server is not running. Restarting..."
    sleep 2
    cd /var/csgosv
    ./start.sh
  else
    echo "Server is running, reattaching session..."
    sleep 2
    screen -r csgo
  fi
else
  echo "Not SERVER_CONTROLLER_USER, skipping server initialization"
fi
Of course, SERVER_CONTROLLER_USER is the user we created before. Oh, and sleep 2 is there so the one who joins can admire my ASCII art I print before taking over the screen – don’t judge me please.
 ____    ____     ___     ______      ______    _________   ________   _______     ______
|_   \  /   _|  .'   `.  |_   _ \   .' ____ \  |  _   _  | |_   __  | |_   __ \  .' ____ \
  |   \/   |   /  .-.  \   | |_) |  | (___ \_| |_/ | | \_|   | |_ \_|   | |__) | | (___ \_|
  | |\  /| |   | |   | |   |  __'.   _.____`.      | |       |  _| _    |  __ /   _.____`.
 _| |_\/_| |_  \  `-'  /  _| |__) | | \____) |    _| |_     _| |__/ |  _| |  \ \_| \____) |
|_____||_____|  `.___.'  |_______/   \______.'   |_____|   |________| |____| |___|\______.'
   ______   ______          ______     ___
 .' ___  |.' ____ \   _   .' ___  |  .'   `.
/ .'   \_|| (___ \_| (_) / .'   \_| /  .-.  \  .--.  .---.  _ .--.  _   __  .---.  _ .--.
| |        _.____`.   _  | |   ____ | |   | | ( (`\]/ /__\\[ `/'`\][ \ [  ]/ /__\\[ `/'`\]
\ `.___.'\| \____) | (_) \ `.___]  |\  `-'  /  `'.'.| \__., | |     \ \/ / | \__., | |
 `.____ .' \______.'      `._____.'  `.___.'  [\__) )'.__.'[___]     \__/   '.__.'[___]
Using the server
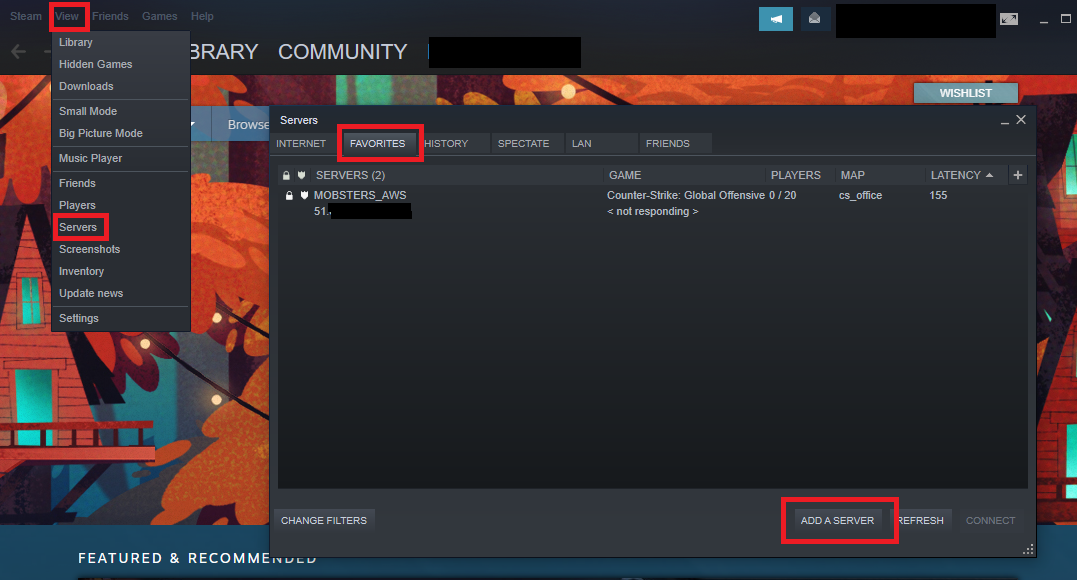
Let’s see what we’ve done. SSH into the server using our special user to start up the server, and add it to your favorites (also send to your friends). You can then join the server and have fun while controlling your server via SSH.
Performance
You must be wondering how the server performs. I mean, on one hand, using one of the smallest instances available in the AWS cloud doesn’t sound super effective, and on the other hand, 15 GB of free outbound bandwidth might not be enough.
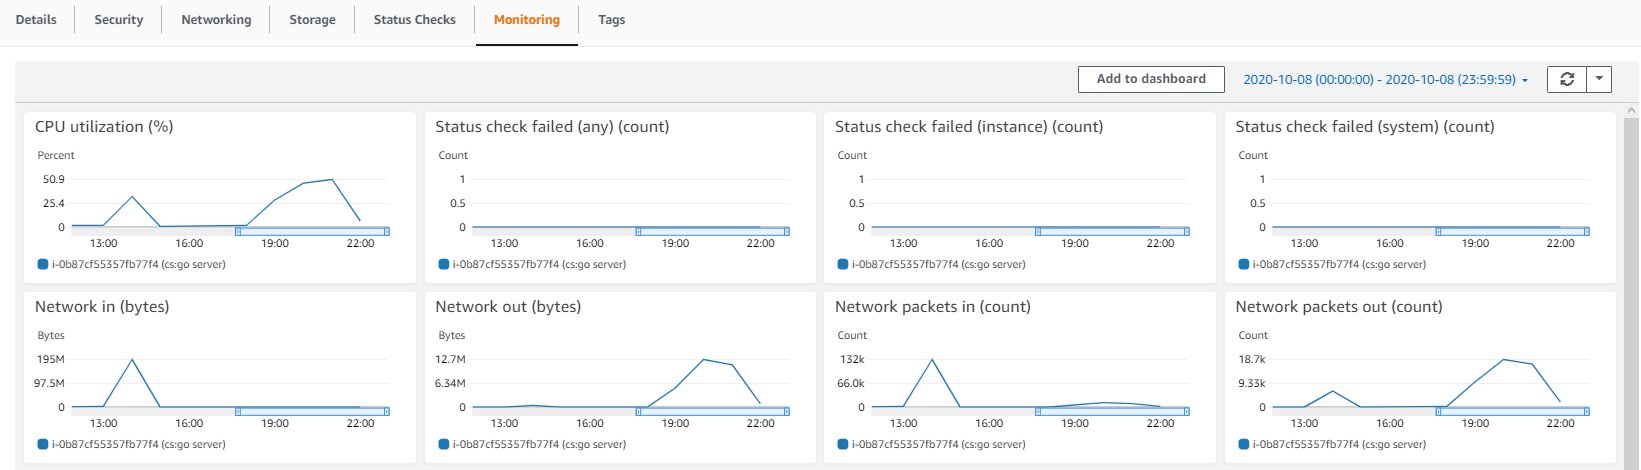
On the graph above you can see the network and CPU usage while setting up the server and while using it with 6 players. Network in is not really relevant, as it is not billed. CPU usage was below 50% most of the time and the network usage was decent as well – we didn’t experience any lag or outage while playing.
Based on my data, if you’d like to use your server 24/7 with many users, then 15 GB bandwidth might not be enough. Otherwise, for 4-5 hour long sessions per week, you will stay below the free tier limit.
The 30 GB Elastic Block Storage is enough as well. The only exception is server updates, when most probably you won’t have enough space. In this case, make a backup of custom scripts and settings, delete the server folder and reinstall it. If you are using Elastic IP, you can even terminate your instance and start this tutorial over again. This way you can leverage of user data to automate most of the process – personally, I haven’t tried it yet and I think this post is long enough already, so it’s left as an exercise for the reader. :) UPDATE: Eventually, I created a user data script to automate the whole process check it out in this post.
Just to make sure you don’t pay more than you want to, you can observe Cloudwatch metrics to monitor your instance and set a Budget to be notified when you start spending (you have 62 budget-months for free, meaning you can have two Budgets set for a full month). To set a Budget, navigate to the Billing service, select Budgets and then Create budget. You can then have an email notification when the predefined percent of your budget is reached.